How to Convert Midi Drum Tracks to Audio in Reaper
Have a kick or snare that's not quite cutting through how you'd like it to? There is the right way to do things, a combination of proper miccing techniques and EQ/Compression… but sometimes perhaps due to a poor initial recording, or just a lack of technical skill/software, you just can't get it quite to where you would like to hear it.
Luckily for us, there is a wide array of options when it comes to drum VSTis and samples, like Toontrack's Superior, XLN's Addictive Drums, and Steven Slate Drums. For this example, I will be using MT PowerDrumkit 2, as it is one of the better sounding free drum plugins.
If you've been on REAPER for any length of time, you'll have noticed that you can use any track as MIDI or Audio, but it is also capable of doing both! REAPER comes out of the box with a plugin called JS: Audio To MIDI Drum Trigger. This plugin allows us to have audio on our effected track, allow a percentage of the original signal through, and trigger a midi note based on the set threshold being passed by the audio signal.
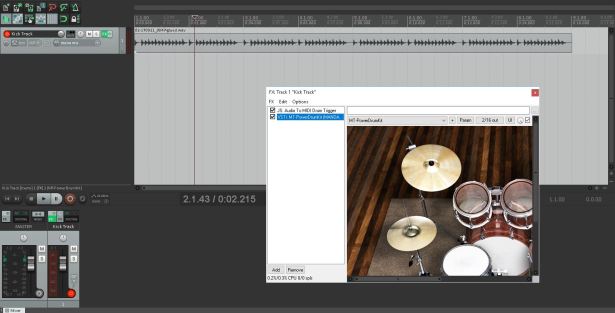
Place your MIDI trigger and drum module onto your kick track. If you already have processing on your kick drum, just place this two plugins at the end of the chain. Open up the interface for the JS:MIDI Trigger, and let's look into the parameters on that.
Open Threshold: What amplitude the midi note will start to draw at.
Close Threshold: What amplitude the midi note will cut off at after drawing.
Retrigger Interval: How long the software will not allow a second trigger after an initial trigger.
Original Signal Mix: Self-explanatory, What % of the original signal will come through the mix.
MIDI Channel: Leave it at 10, we are usually routed to go through all 16 Channels.
MIDI Note: This sets which note will be triggered. Presuming you want to trigger your kick, set it to 36.
Trigger Align: If your trigger sounds behind or ahead of the beat, set this accordingly. (or small movements to play with phase between sounds).
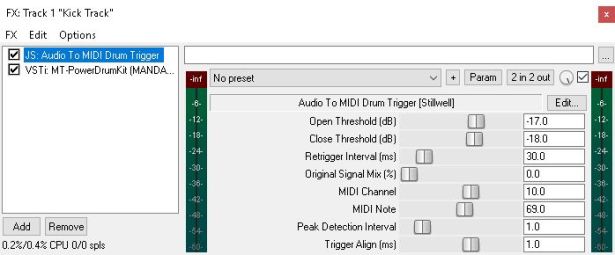
From here, we will want to set our threshold to match our original input. You will want your Open Threshold a 4-6 dB below the volume of your average kick hit. Your Close Threshold can be set 4-6dB Below that. While listening through your kick track, keep lowering the Open Threshold until every kick hit is picked up. If you are hearing false triggers, you have gone too far.
The style of music will determine how you set your Retrigger Interval. If you are working with slower music without any rapid double hits, you can set this around 80-150mn to really shut down any false triggers. If you are working with some blistering metal, you may want to leave it close to 30-50ms. When listening through your mix, after you are certain in your threshold settings, this is the next place to shut down false-triggers.
Your Original Signal Mix is completely up to you. If you are going for 100% sample replacement, leave it at 0.
If you are bolstering your kick drum, your MIDI Note can be set to 36. Reference THIS chart, if you are trying to trigger any other drum.

(The Audio To MIDI Drum Trigger tends to output low velocity notes, the MIDI Velocity Control plugin displayed above is a quick fix!)
At this point, after enabling your drum module, your trigger should be fully functional!
OPTIONAL
Up next, is routing your MIDI signal to a separate track. For a little more control over your sound, you may want two separate channels for your triggered sample and original kick. I'll be explaining two steps, one step to have the midi directly routed to your drum module from track to track, and one step to record the midi output for manual control over the input.
Step One
Remove your drum module from your kick drum track, and place it onto a new, empty track. On your MIDI Drum Trigger, set your Original Signal Mix to 100. You will be able to adjust this track's volume separately from now on.
Open the routing section of your kick track, and add a new send. In the dropdown menu, select the track you have placed your drum module on.
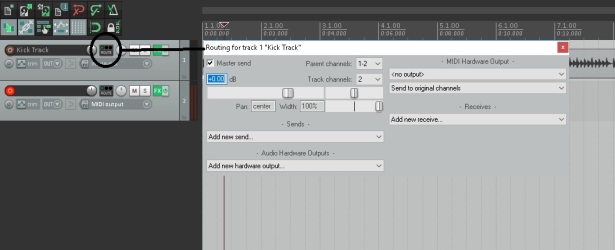
Press the "MIDI" button on the send, which looks like the end of a midi cable.
In the audio dropdown of the send, choose "none". In the MIDI dropdown, select "All>All"

Now your original kick will be playing from the kick track, and sending the MIDI information from the trigger plugin to your Drum VSTi track. While you can stop here, the next step will be recording that MIDI information.
Step Two
Right-click the record-arm button on your VSTi Drum Module track. Select Record: Output>MIDI. You will need to disable the Drum VSTi to capture the MIDI performance, so press the Track FX button, and Record arm the track. Press the record button, and while your track plays through, it will be writing the signal from your trigger. After you've captured the performance, you can delete/disable the trigger on your original kick track. The Send can also be deleted, if you are confident with your trigger settings. Turn the FX back on for your newly recorded trigger track, and you're finished! You've now got a MIDI performance of your kick drum for fine-tuning.

Hope some of you found this useful, stay tuned for future tutorials, articles, and personal news!
How to Convert Midi Drum Tracks to Audio in Reaper
Source: https://jakeduffieaudio.com/articles/reaper-miditrigger/
0 Response to "How to Convert Midi Drum Tracks to Audio in Reaper"
Postar um comentário